Material List to DIY a Cattle Panel Greenhouse
Before moving further into the detailed plan, let’s have a quick look at all materials and tools needed to build a DIY cattle panel greenhouse. Don't get overwhelmed by the length of the list – there's a good chance you've got a treasure trove of these items tucked away already, particularly if you're a seasoned gardener.
Building Materials:
- Greenhouse plastic - must have
- Cattle panel - must have
- Greenhouse door - preferably a wood door
- Foam pipe insulation - used to prevent heat loss and protect the pipes from extreme temperatures
- Reinforcing bars - use rebar whenever your feel necessary
- Greenhouse footing- wood, bricks, concrete, simply go with anything you like
- Shims - preferably wood
- Boards of all dimensions - depending on the greenhouse size
Essential Tools:
- Measuring and layout tools: Tape measure, Carpenter's square, level (spirit level)
- Cutting tools: Circular saw
- Fastening Tools: Hammer, screwdrivers, power drill, staple gun, screws, nails, and other fasteners
How to Build a Cattle Panel Greenhouse: Dimensions & Steps
The cattle panel greenhouse dimensions mainly count on your goals, available space, and budget. For starters, it’s suggested to build less challenging ones such as a small or medium-sized cattle panel greenhouse. An 8’x12’ one would be a good start.
As for the height, a minimum height of 6 to 7 feet (1.8 to 2.1 meters) in the center is a common starting point for a standard greenhouse, allowing most growers to move and work comfortably. However, if you plan to grow vertically tall plants, you might consider a higher structure, such as 8 to 10 feet (2.4 to 3 meters) or even taller.
Once you’ve made up your mind about the scale of homemade cattle panel greenhouses, let’s hands-on building one!
Step 1: Imagine & Design the Cattle Panel Greenhouse
Before diving into the construction of your cattle panel greenhouse, it's crucial to decide and personalize the design that best suits your needs and preferences. Here's how you can make informed decisions for a successful greenhouse project:
- Wall Design for Height and Charm:
Choose between 20" high wood walls or attaching panels to 2x4s on the ground. Wood walls often offer benefits like increased height, wind stability, and better airflow.
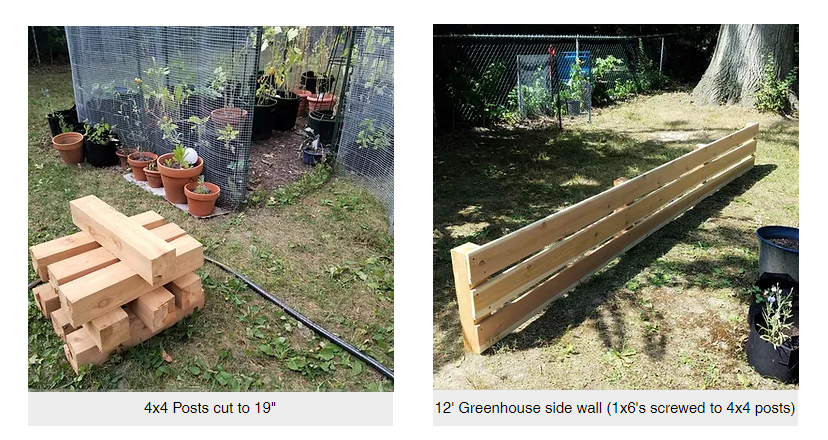
image source: theeverydaygreenhouse.com
- Foundation and Anchoring:
Determine whether you want to set your greenhouse on a foundation or keep it moveable. If you choose not to build a foundation, consider attaching rebar to the long sides and anchoring them into the ground.
- Optimal Size:
When it comes to size, select dimensions that align with standard board lengths for ease of construction, say, I would prefer an 8'x12' size for my greenhouse.
Step 2: Crafting Cattle Panel Greenhouse Walls
With your chosen greenhouse design in place, it's time to roll up your sleeves and build the 12' greenhouse walls. To get started, follow these step-by-step instructions:
- Gather Materials:
Acquire three 12' lengths of 1x6 cedar boards for each side of the greenhouse. You'll also need four 4x4 cedar posts, each cut to a length of 19".
- Create the Wall Frame:
Begin by attaching the 1x6 cedar boards to the 4x4 cedar posts. Use a circular saw to make precise cuts on the 4x4 posts. Don't worry if your initial cuts aren't perfect; practice will improve your skills. Place the top 1x6 about an inch higher than the top of the 4x4 posts to create a ledge for the cattle panels. To fasten the boards to the posts, use deck screws, which provide a secure connection.
- Allow for Airflow:
As you attach the boards to the posts, leave approximately one inch of space between the boards. This gap allows for proper airflow within the greenhouse, particularly during warmer weather.
Step 3: Connecting the Side Walls and Adding the Mulch Floor
In this crucial stage of your greenhouse construction, you'll connect the side walls and create the greenhouse floor. Follow these steps carefully to accomplish this phase:
- Connect the Side Walls:
Join the two 12-foot walls by introducing an 8-foot 2x4. This 2x4 aligns with the 4x4 cedar posts and is securely fastened using robust steel angle brackets. Although initial construction photos were limited, subsequent images were captured approximately a year later.
- Level the Ground:
Achieve a solid foundation by ensuring the ground is level. Employ a level tool on all sides and make minor soil adjustments to ensure the frame rests firmly on the ground.
- Create the Greenhouse Floor:
Take the next step by crafting the greenhouse floor. Begin by placing two layers of cardboard on the ground. This layering effectively smothers existing grass. On top of the cardboard, evenly distribute several bags of cedar mulch. Cedar mulch is prized for its aromatic scent, extended lifespan compared to other mulch varieties, and inherent insect-repelling properties.
Step 4: Attaching the Cattle Panels to the Wood Walls (there are three)
This step marks the exciting phase of securing the cattle panels to the wood walls.
- Initial Preparations and Ease of Handling:
Begin by transporting the cattle panels to your construction site. Despite initial apprehensions, moving these panels proved to be smoother than expected. Measuring 16'x50" and weighing 32 pounds, they fold into an arch shape with surprising ease. You can handle them on your own, and they typically fit in a standard pickup truck.
- Step-by-Step Attachment:
Start the attachment process by nailing the middle panel to the 4x4 posts using galvanized fence staples. This step is relatively straightforward. Moving on to the second and third panels might require more finesse, as they overlap the middle panel by a few inches. The arch's shape and the metal's limited flexibility may necessitate assistance from a second person to hold and maneuver the panels for optimal positioning.
- Reinforcement for Stability:
Bolster the stability of the attached panels by employing pieces of plumber's pipe strapping. Use these straps to connect the panels to the 1x6 greenhouse walls. For inter-panel attachment, zip ties prove effective. Keep in mind that minor adjustments might be needed, so don't hesitate to redo connections for the best results.
- Managing Outward Pressure and Bowing:
Note that once the panels are arched and connected to both sides, they exert outward pressure on the walls, causing them to bow. To address this, employ tie-down ratchet straps to gently pull the sides inward while attaching the front and back frames.
Step 5: Finishing the Front and Back Walls
As your greenhouse takes shape, the time has come to initiate the construction of the front and back walls, as well as the frames for the doors.
Begin by enhancing the front and back walls on one side. Attach three 1x6 boards to these walls. The lengths of these boards are determined by the size of your intended door frame, a calculation explained in the subsequent step. To facilitate a swift process, have the boards cut to the required length at the home improvement store.
Note: If you're working solo, consider using trigger clamps to securely hold the wood in place while attaching the boards to the 4x4 posts. Additionally, install one side of the door frame to facilitate the attachment of the side boards. Use steel angle brackets to fasten the frame to the bottom horizontal 2x4.
Step 6: Measuring and Finishing the Door Frames
Moving forward, take on the task of determining the dimensions of the doors and their frames. If you've opted to purchase doors, there are significant benefits, including enhancing the overall appearance of the greenhouse and saving time. However, crafting your own doors can save money. To ascertain the appropriate size for the door frame, lay the frame components and the door on a flat surface for visualization. This helps in gauging the required space between the door and frame. Consider hinge placement and ensure there's a small gap at the bottom, top, and sides. Measure these dimensions meticulously for accuracy.
With one side of the door frame in place, attach the other vertical 2x4. Add the remaining 1x6 boards to complete the wall on the opposite side of the door. For the top of the door frame, cut a 2x4 to the required length and secure it in position. Repeat this process for the other side of the greenhouse.
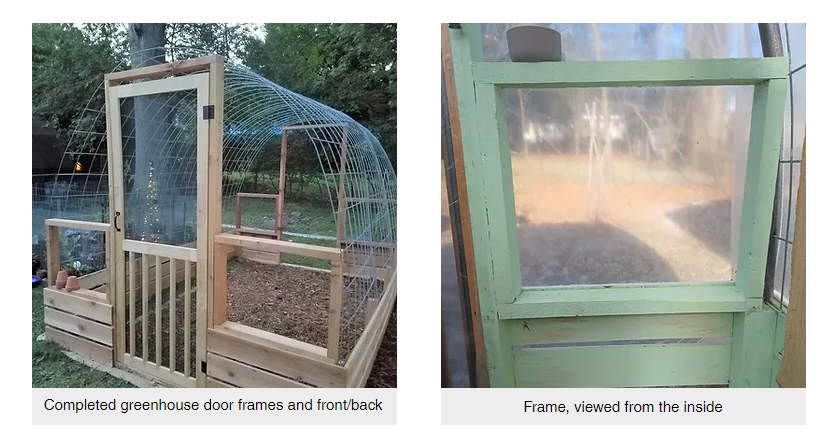
image source: theeverydaygreenhouse.com
Step 7: Fortifying the Front and Back Walls
To enhance structural stability, advance to fortifying the greenhouse's front and back sections. Integrate "frames" constructed from 2x4s above the side walls. Pre-measure, cut, and assemble these frames before attaching them to the greenhouse. A total of four frames are used, affixed to both the door frame and the 4x4 posts. Observe how the cattle panels now gracefully arch against the side and door frames, creating a visually appealing and secure arrangement.
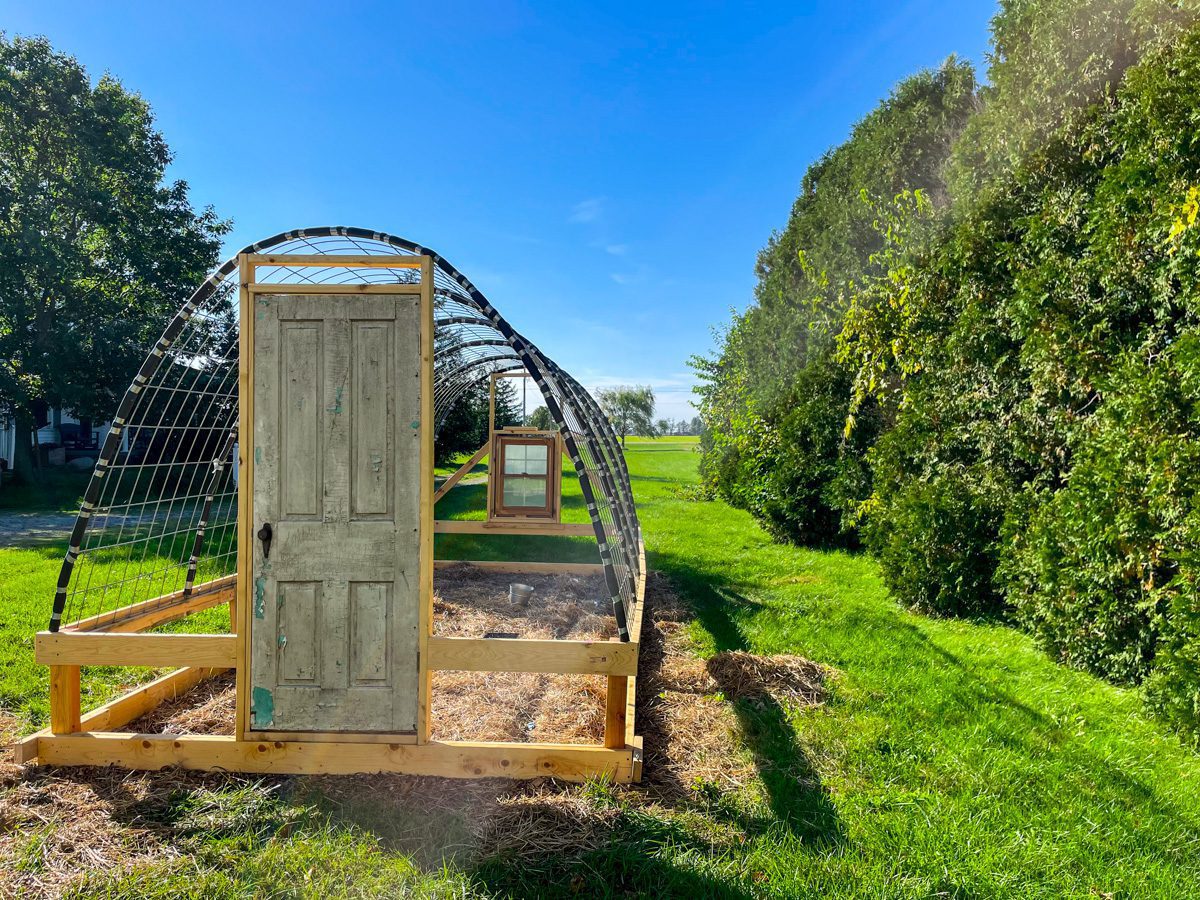
image source: wholemadehomestead.com
Step 8: Adding the Overhead Beam
For the final touch of this phase, introduce a 12-foot 2x4 overhead beam between the two doors. Strengthen this structural addition by utilizing a steel rafter tie, a component that provides robust support. Enlist another person's assistance, especially if you're shorter in stature, to lift the beam into position. With perseverance and teamwork, the overhead beam contributes vital stability to your greenhouse's framework.
With the completion of these steps, your greenhouse's structural foundation is becoming more tangible. As you proceed, the vision you've held is steadily turning into reality. You can now move forward to hanging the door. Simply start by attaching hinges and handles. Then make proper adjustments.
Step 9: Covering the Sharp Metal Ends of the Panels
In this straightforward yet essential step, you'll safeguard your greenhouse plastic from potential damage caused by sharp metal edges. The foam pipe insulation you purchase should be pre-split down the middle, making it an easy installation onto the ends of the cattle panels.
Once you have the appropriate foam pipe insulation, slide it onto the ends of the cattle panels. The split in the insulation allows it to snugly fit over the metal edges, providing a cushioned and protective barrier.
Step 10: Stapling on the Greenhouse Plastic
Finally, you can enclose the greenhouse with the essential greenhouse plastic.
- Selecting the Plastic:
Acquire greenhouse-specific plastic intended to last around four years. While many find it lasts longer, it's prudent to be prepared for potential replacements down the line.
- Unrolling and Lifting the Plastic:
Choose a dry, calm day for this step. Unroll the plastic roll, usually around 24'x40' and weighing about 30 lbs. Enlist helps to lift the edge of the plastic over the panels to the ground on the opposite side. Ensure the plastic extends a couple of feet below the bottom of the greenhouse.
- Stapling Process:
Begin stapling the plastic to the top 1x6 board on one of the long 12’ sides. Keep the plastic as smooth as possible during this process. Avoid stapling the plastic to the bottom two boards, as it will be rolled up during summer for ventilation. Repeat the stapling process on the opposite side, ensuring the plastic is reasonably taut.
- Working on the Ends:
Handling the ends of the plastic can be likened to wrapping a challenging gift. Wrap the plastic around the corners, adjusting and folding it to lie flat. Spring clamps can be used to temporarily hold the plastic while stapling. Be ready to adjust and restaple as needed for the desired appearance.
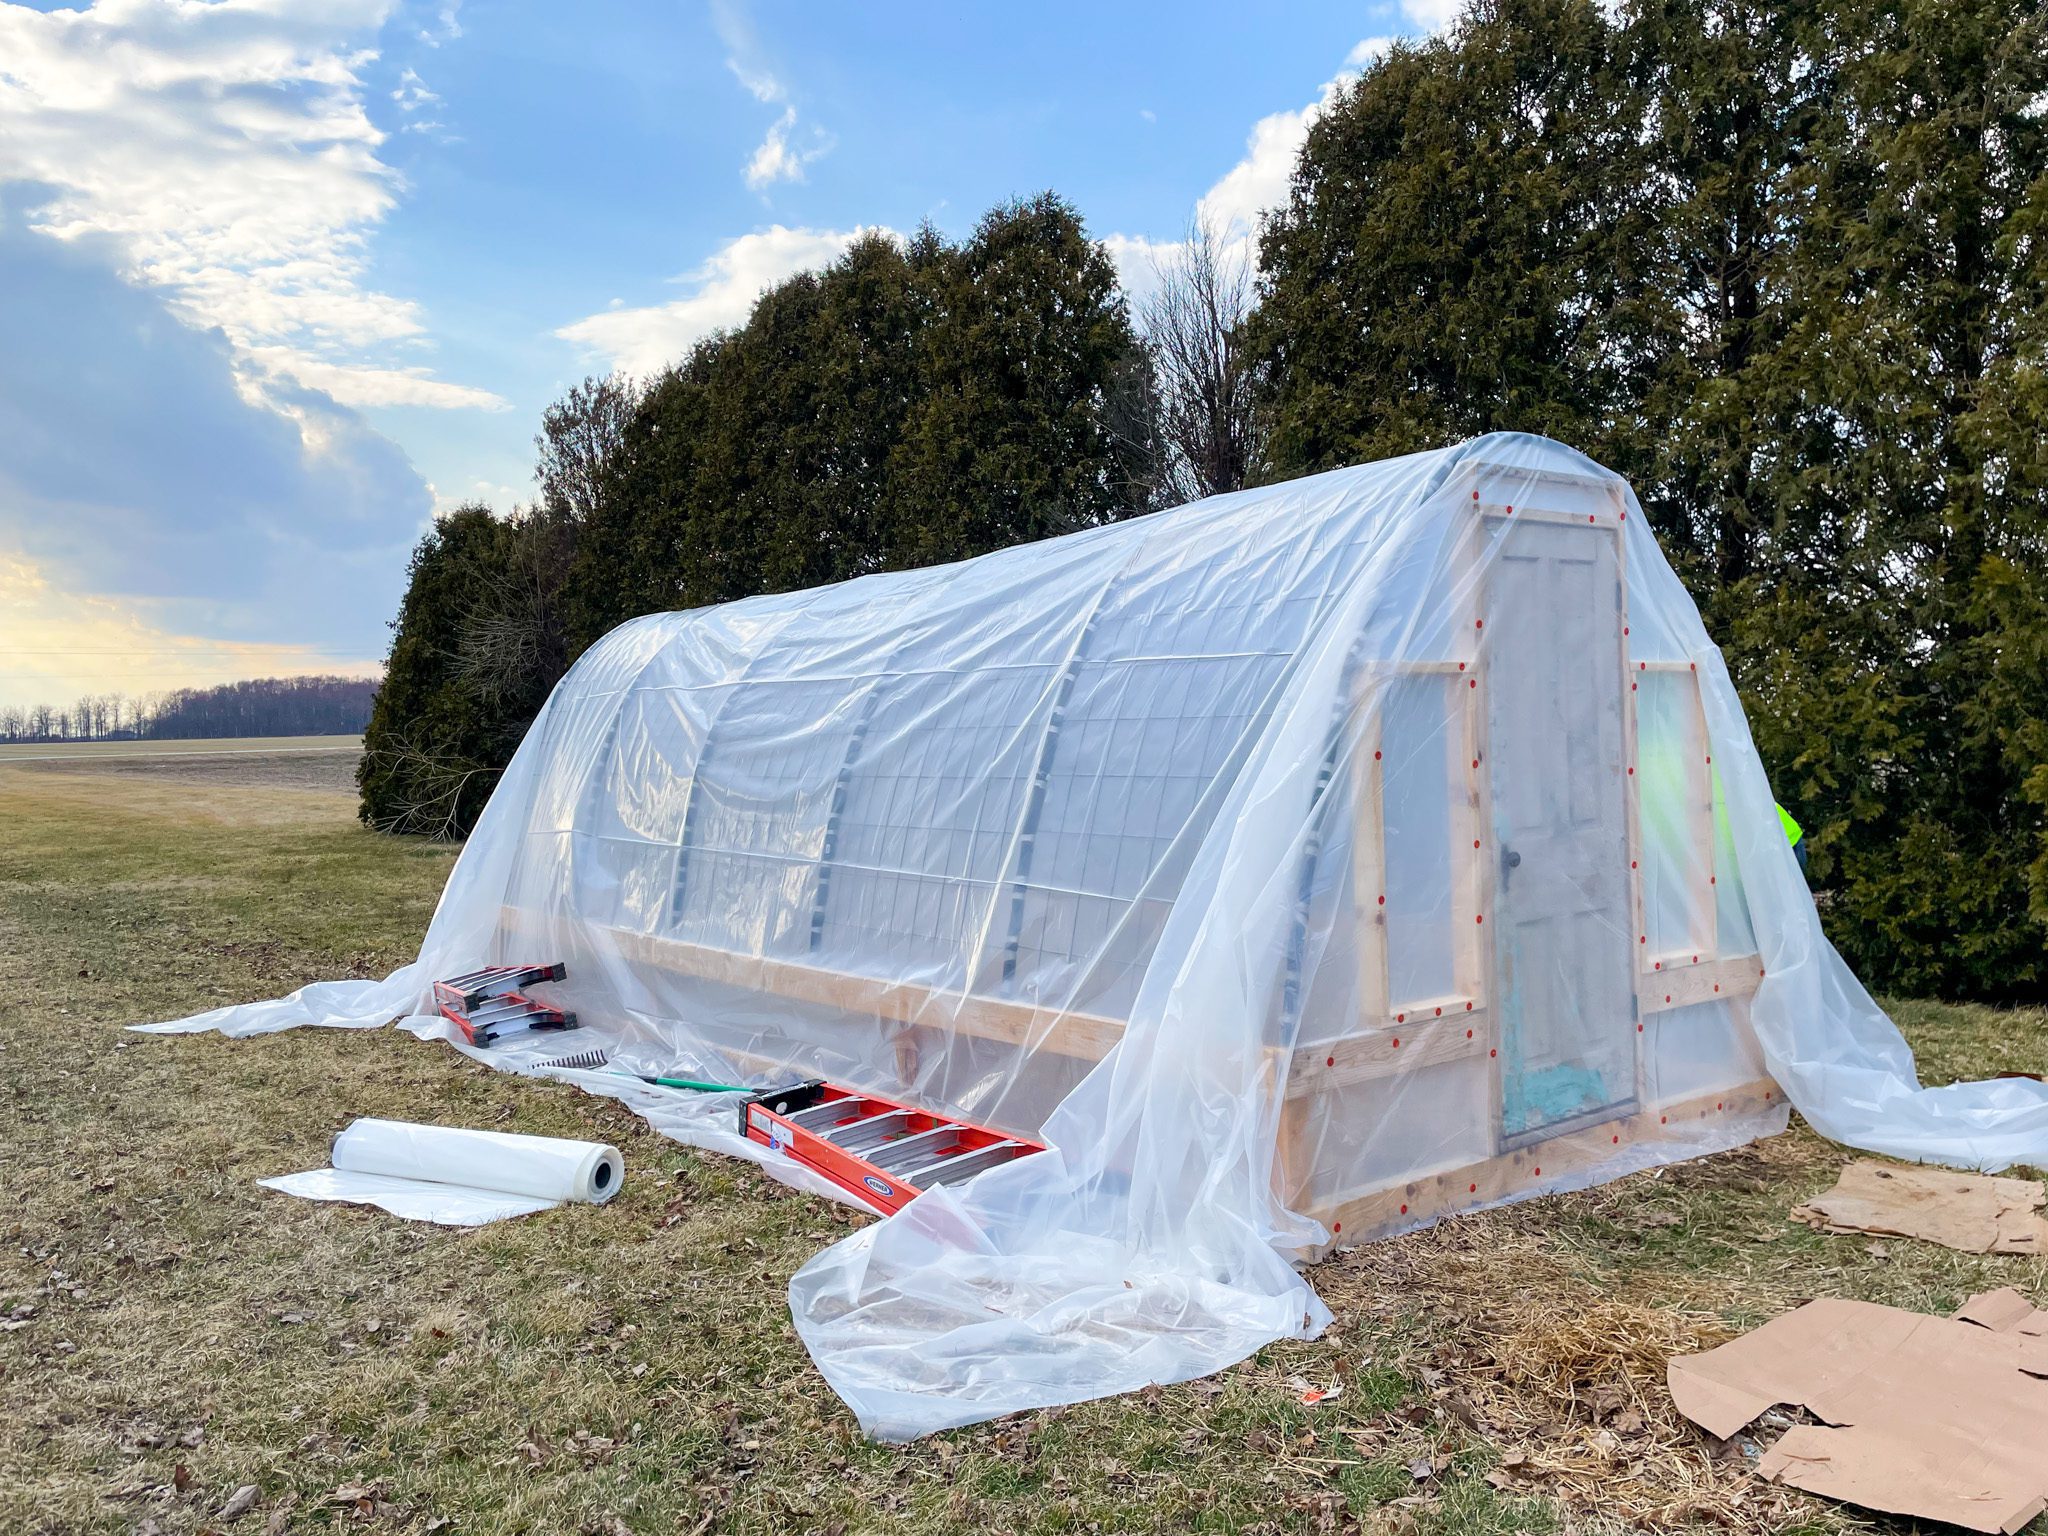
image source: wholemadehomestead.com
Doing so dar, you are almost done building a cattle panel greenhouse! Depending on the weather of the area you are in, you can decide to add a few trims to safeguard the greenhouse against strong wind.
Alternatively, you can opt for Youtube videos to learn how to build a greenhouse with cattle panels.